Pages

Showing posts with label Simon Says Stamp. Show all posts

Sunday, July 29, 2018

A lunch bag turns into a card!


I created this card from a paper lunch bag!  I had no idea what I would do with it.  When I put the finishing touches on it, however, I realized that it would be a perfect gift for sister.  I even slipped a Michael's gift card in one of the pockets for her to treat herself.

I am entering this into Simon Says Stamp's Anything Goes Wednesday ChallengeEDIT:  I clicked on the wrong picture for the thumbnail for the link, and I cannot change it.  My apologies for the incorrect photo.

Enjoy the video tour below:


sig3new

Monday, February 19, 2018

Happy Birthday, Becca

I made this card for our daughter-in-law's birthday earlier this week.  I am still loving the Simon Says Stamp card kit that I bought way back in October.


sig3new

Saturday, May 16, 2015

VES PTO is the BEST!

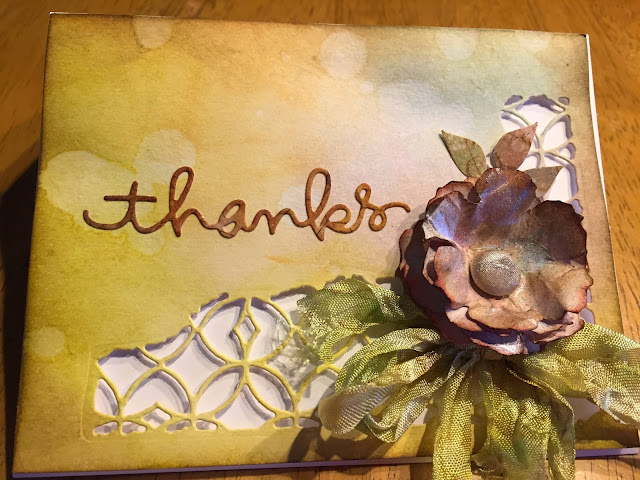
The week of May 4-9 was Teacher Appreciation Week.  And, boy, were we teachers appreciated!  They went all out with lunch on Monday and breakfast EVERY MORNING AFTER THAT!  Then on Friday we received coupons for a free massage, a coupon book, and a gift card.  Did I mention that we felt really appreciated?  Well, we were!  So, this is my little thank you card that I whipped up and left in the PTO mailbox.  Just a small way of thanking them for thanking us.

 
I used my new Tim Holtz Sizzix Mixed Media die for the cutout and my Simon Says Stamp Thanks Craft Die S202.  The flower comes from Tim's Tattered Florals die; everything is on white cardstock that I colored using a number of Distress Inks.
 
I am entering this into the Simon Says Stamp Monday Challenge Blog: Challenge: Simon brand products.  As mentioned above, I used the Thanks Craft Die S202.
 
sig3new

Thursday, March 19, 2015

One cut ... two ways

In today's Online Card Class called Stretch Your Dies, we learned how to use our mini dies in a variety of ways.  I don't have a lot of dies, but I do have a Cricut Expression 2!  So, using Cricut Craft Room, I managed to lay out all of these tiny stars.  I then cut them out along with my Simon Says Stamp Thanks Craft Die S202.  I used the cut out to adhere the pieces to a piece of white cardstock.  Then I added the green cardstock to another white card blank to make a second version.  Cool beans!


Don't forget: Whether you think you can or you think you can't ... you're right!


sig3new

Monday, March 16, 2015

Spring Break!

Yes, it's time for Spring Break!  I am ready (as are the students!) for this week to relax, refresh and recharge.

I was so excited to discover that the Online Card Class titled Stretch Your Dies started today!  At the last minute last night, I decided to register.  I am not disappointed!  Already, I have made an adorable card using one of today's lessons from Jennifer McGuire.  I pinned this card just yesterday, and I knew that it would be perfect to scraplift (cardlift??) with this technique.  I used my Simon Says Stamp Big Hello die to cut the piece that I attached, and then I glitzed it up with my clear Wink of Stella pen. 

I have to mention that I love using the knot-tying technique by Stamper Dog titled Save Ribbon Tying a Finger Knot Bow.  I use this technique a lot, but every time I do, I have to watch the video. 


sig3new

Saturday, January 17, 2015

Watercolor Hello

This is going out to a friend who is in the hospital.  I had so much fun trying out the watercoloring techniques I've seen online recently.  I colored some paper with several colors of Tim Holtz' Distress Inks a few weeks ago, and it was sitting in my stash.  I decided to use my new My Favorite Things' Snow Drifts die that I purchased last month at Violette's Scrapbook Store in Lakeland, Florida.  (If you are in the Tampa/Orlando area, it's a quick trip ... I promise you won't be disappointed!)


Then, I layered on the Simon Says Stamp Big Hello Die which I highlighted with my Wink of Stella Clear Brush.  Love it!

I am entering this into the Simon Says Stamp Monday Challenge Inky Background.


sig3new

Tuesday, January 6, 2015

A sparkling white thank you

Well, this card certainly shows my love for dies. Cheery Lynn Designs Lace Corner Deco I die.  It's intended for corners, but it also makes a unique focal point in the middle of my card.  I am entering this into Cheery Lynn Designs blog challenge #166 titled Winter Whites.

I also used Simon Says Stamp Thanks Craft Die S202. Doesn't that thanks add just the right amount of sparkle to the card?  I also filled in the spaces in and around the corner dies using a clear Wink of Stella pen.  If you look closely, you might see the glitz there! I am entering this card into the Simon Says Stamp Wednesday Challenge blog Anything Goes challenge. Everything sits on top of the Spellbinders Fancy Postage Stamps die that I used for the background.

sig3new

Wednesday, December 24, 2014

Happy Anniversary

This card is going to sister and The Runner to celebrate their 21st anniversary on December 23.  It's inspired by this card by Shari Carroll on the Simon Says Stamp blog.  Isn't the Mama Elephant happy die adorable? 


sig3new

Thursday, December 18, 2014

Sunday, November 30, 2014

Photography Trials and Tribulations

I read a great blog post this morning from Debby on the Simon Says Stamp blog. She gave some excellent advice about photographing cards.  Since I have the space in the guest bedroom, I decided to take the plunge and set up in there; I won't have to knock down the setup until we have a guest and need the space.

Here are my first attempts.  I shot in RAW and then did some editing.  I can't figure out why the colors came out differently, especially since I didn't change anything except for changing out the different cards.  (That's why I added Tribulations to the title.)

You'll notice that the next two cards are the same layout.  I used a sketch that I found on Operation Write Home.  What a project that was ... trying to align everything perfectly!


This card is based on an old Mojo Monday sketch.  I've had it in my stash for a couple of months.

Finally, here's another simple card that is in my stash. My camera doesn't sit too straight on the tripod, which is another tribulation.  I think I might ask Santa for a new tripod.


sig3new

Sunday, June 15, 2014

Happy Father's Day

I am entering this in Frilly and Funkie's challenge For All Our Fathers. As soon as I saw Tammy Tutterow's tag "We Come to Love" I knew how to go about creating this card.  My son gave me the Tim Holtz buckles for a Mother's Day gift, and this was the perfect use for it.

In addition, I am entering it into Simon Says Stamp's Wednesday Challenge for this week titled "Stencil It".  I really love my Tim Holtz stencils!


Saturday, March 1, 2014

Pretty in Pink


There was so much inspiration for this piece. It all started when I spent hours on Gabrielle Pollacco's website ... her videos are exquisite! I just went into my studio and started working with no plan for what I was going to create. Paint here ... torn paper there ... swipes of gesso on top ... add a spritz and a spray of Tattered Angels! One of the techniques that Gabrielle demoed that I tried was adding texture using a stencil and modeling paste.  Love that!
Then last week I watched Tammy Tutterow's online demonstration Euphoric Ephemera. I didn't know what I would use for decorations, but her examples were perfect. I downloaded one of the (or maybe both of the) vintage graphics from The Graphics Fairy. I also used Tammy's idea of embossing cardstock to look like a cabinet card. In addition, I added half of a doily that I stained with distress inks with a little pink feather tucked under the bow. I love the way to make the bow that Tammy demonstrated.

The postcard is attached only with the swirly paper clip and is tucked under the bow to hold it in place. That way I can change it as needed and even add a photograph. Instead of using foam squares to attach this part of the project, I cut a piece of foam just a bit smaller than the "cabinet card" and attached it with double-sided tape. I like how this adds some real stability to the grouping.
 

Today was the day to put it all together. I had a strip of glossy paper that I made using alcohol inks, a technique that I learned in Tim Holtz's Creative Chemistry 101 class. I love the way the paper looks like it has many layers of color.  That strip of paper went onto the canvas.The little Eiffel Tower charm was a make and take that I acquired at "convention" last summer in Arlington, Texas; sister and I had a blast that day! Isn't this shrink art just the cutest thing you've ever seen?
That day in Texas I also purchased some ribbon from Melissa Frances ... what a cute flower it turned into! I added a flower made with my go-to Sweet Williams Strip die; it's leaf is another alcohol ink creation on kraft glassine. 
I am submitting this to the following challenges:
Now, where will I hang this?